Crispy Chicken Caesar Sandwich-Best Flavor
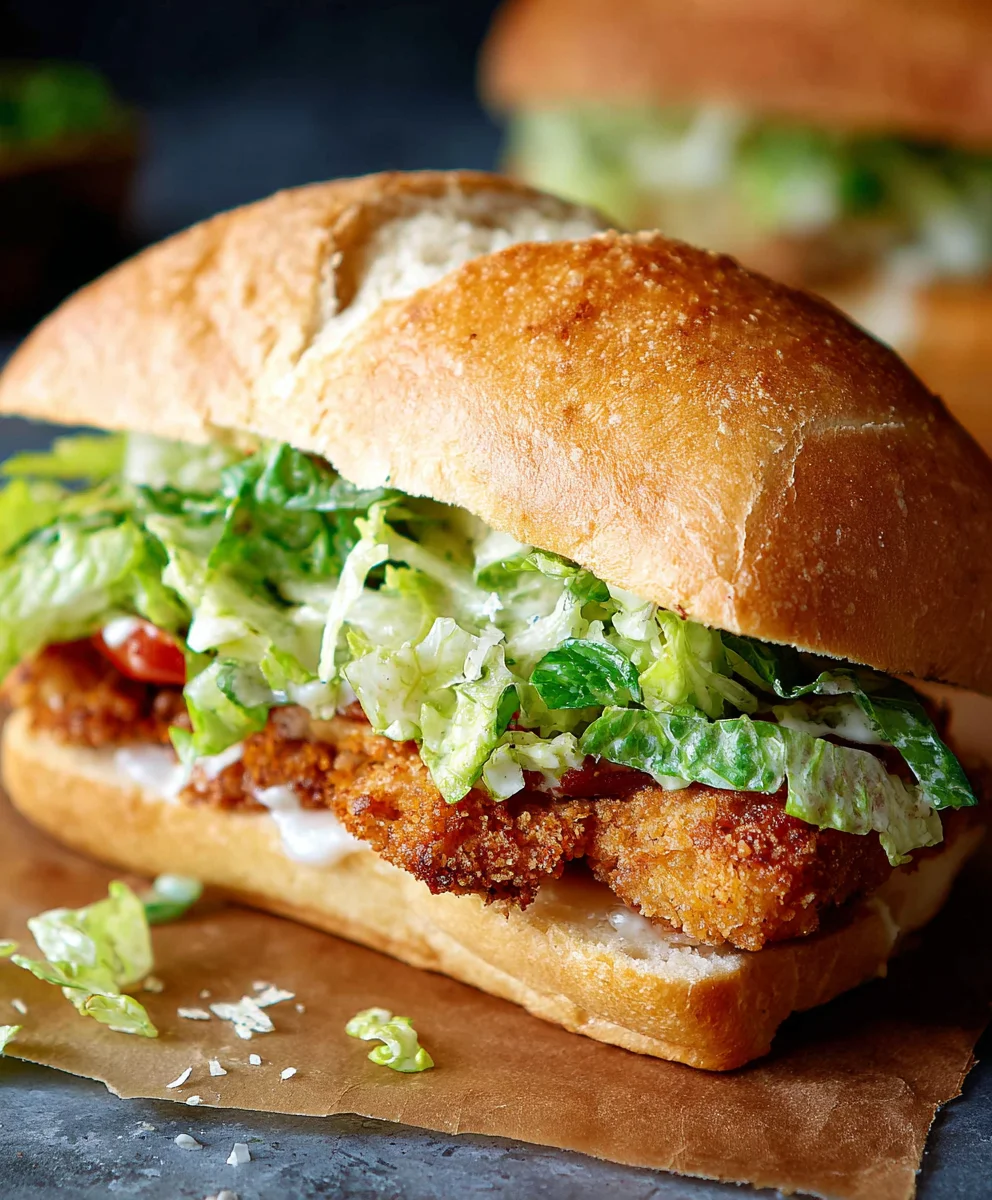
Crispy Chicken Caesar Sandwich! This isn’t just another sandwich; it’s a symphony of textures and flavors that has captured the hearts (and appetites) of food lovers everywhere. Imagin extracte the satisfying crunch of perfectly golden-fried chicken, nestled within soft, pillowy bread, all brought together by that iconic, creamy, tangy Caesar dressing. It’s the kind of meal that transcends ordinary lunch and becomes an experience. People adore this sandwich because it’s familiar yet exciting, delivering all the beloved elements of a classic Caesar salad in a handheld, incredibly convenient, and utterly delicious format. What truly makes the Crispy Chicken Caesar Sandwich special is the harmonious balance: the bright zestiness of the dressing cuts through the richness of the chicken, while the crisp lettuce adds a refreshing contrast. Get ready to elevate your sandwich game with this sensational recipe that’s guaranteed to become a new favorite in your culinary rotation.
Ingredients:
- ½ cup full-fat mayonnaise
- 3 tbsp Greek yogurt
- 1 tsp Dijon mustard
- 1 tsp Worcestershire sauce
- 2 tbsp fresh lemon juice
- ¼ cup freshly grated Parmesan cheese
- 1-2 garlic cloves, minced
- ¼ tsp black pepper
- Pinch of sea salt
- 5 chicken cutlets (about 4-6 ounces each, preferably boneless and skinless chicken breast pounded to about ½-inch thickness)
- Sea salt, to taste
- Ground black pepper, to taste
- Vegetable oil or canola oil, for frying (enough to generously coat the bottom of your pan, about ½ inch deep)
- ⅓ cup all-purpose flour
- ½ tsp salt
Preparing the Crispy Chicken Caesar Sandwich
Making the Caesar Dressing
First, let’s craft the backbone of our sandwich: a zesty and creamy Caesar dressing. In a medium bowl, combine the full-fat mayonnaise and Greek yogurt. The mayonnaise provides richness, while the Greek yogurt adds a pleasant tang and lightens the texture slightly. Next, whisk in the Dijon mustard for a pungent kick, and the Worcestershire sauce for a depth of umami flavor. Add the fresh lemon juice – its brightness is crucial for cutting through the richness and bringin extractg all the flavors together. Now, stir in the freshly grated Parmesan cheese. Using freshly grated Parmesan makes a significant difference in flavor and texture compared to pre-shredded varieties, as it melts and incorporates more smoothly. Finally, add the minced garlic cloves, a good grinding of black pepper, and a pinch of sea salt. Whisk everything together until it’s beautifully emulsified and smooth. Taste and adjust the seasoning if necessary; you might want a little more lemon juice for extra zing, or a touch more salt. Set this glorious dressing aside. This can be made a day in advance and stored in an airtight container in the refrigerator, allowing the flavors to meld even further.
Preparing the Chicken Cutlets
Now, let’s get our chicken ready for its crispy destiny. Take your chicken cutlets and pat them thoroughly dry with paper towels. This step is paramount for achieving truly crispy chicken, as moisture is the enemy of crispiness. Season both sides generously with sea salt and ground black pepper. You want to ensure the chicken itself is well-seasoned, as it will be the star of the show. In a shallow dish or plate, place the all-purpose flour and add ½ teaspoon of salt to it. Give it a quick mix to combine. Dredge each seasoned chicken cutlet in the seasoned flour, ensuring it’s evenly coated on all sides. Gently shake off any excess flour. This flour coating will help create that irresistible crispy crust when fried. If you want an extra-crispy coating, you can double-dip: after the initial flour coating, dip the chicken back into the Caesar dressing (just a light coating) and then back into the flour. This technique, often called a “wet dredge,” creates a thicker, more textured crust. However, for a simpler, classic crisp, the single flour dredge is perfectly sufficient.
Frying the Chicken
It’s time to bring on the heat and achieve that perfect golden-brown crispiness. Pour your chosen frying oil into a large skillet or Dutch oven, ensuring it’s about ½ inch deep. Heat the oil over medium-high heat until it reaches approximately 350°F (175°C). You can test the oil by dropping a tiny pinch of flour into it; it should sizzle and float to the surface immediately. Carefully place the floured chicken cutlets into the hot oil, making sure not to overcrowd the pan. Cook in batches if necessary to maintain the oil temperature and ensure even cooking and crisping. Fry the chicken for about 4-6 minutes per side, or until it’s golden brown, cooked through, and has a delightful crunch. The internal temperature should reach 165°F (74°C). As each piece of chicken is perfectly fried, remove it from the skillet with a slotted spoon or spider strainer and place it on a wire rack set over a baking sheet. This allows excess oil to drain off, keeping the chicken beautifully crisp rather than greasy. Season the hot chicken with a little more sea salt immediately after frying for an extra burst of flavor.
Assembling the Crispy Chicken Caesar Sandwich
With our golden, crispy chicken ready, it’s time to assemble these magnificent sandwiches. You’ll need your favorite sandwich rolls or buns. Lightly toast the inside of the buns for added texture and to prevent them from getting soggy from the dressing. Generously spread a good amount of your homemade Caesar dressing on both halves of the toasted buns. Don’t be shy with the dressing – it’s a key component! Place a warm, crispy chicken cutlet on the bottom half of each bun. Now, for the quintessential Caesar salad topping: a generous pile of crisp romaine lettuce leaves. You can roughly chop the lettuce or use whole leaves, depending on your preference. For an extra touch of authentic Caesar flavor, you can toss the lettuce with a little more of the Caesar dressing before adding it to the sandwich. Finally, sprinkle a little more freshly grated Parmesan cheese over the lettuce and chicken. This adds another layer of salty, nutty goodness. Place the top half of the bun over the filling.
Finishing Touches and Serving
To elevate your Crispy Chicken Caesar Sandwich even further, consider these finishing touches. You can add a few thin slices of ripe tomato for a burst of freshness and acidity, or some thinly sliced red onion for a subtle bite. Some people also enjoy adding a sprinkle of capers for a briny pop. If you want to add another dimension of flavor, a drizzle of balsamic glaze over the filling before closing the sandwich can be divine. Serve your sandwiches immediately while the chicken is still hot and incredibly crispy, and the buns are perfectly toasted. These sandwiches are fantastic on their own, but they also pair wonderfully with a side of seasoned fries, a simple side salad, or even some coleslaw. The combination of the crunchy chicken, the creamy, tangy Caesar dressing, the fresh lettuce, and the salty Parmesan is truly a winner. Enjoy every delicious bite of this ultimate comfort food creation!

Conclusion:
And there you have it – your guide to crafting the ultimate Crispy Chicken Caesar Sandwich! We’ve walked through each step, from achieving that perfect golden crunch on your chicken to layering on the creamy Caesar dressing and crisp romaine. This sandwich isn’t just a meal; it’s an experience. I hope you feel confident and inspired to recreate this delightful dish in your own kitchen. Don’t be afraid to experiment with the components to make it truly your own. Enjoy every satisfying bite!
For serving suggestions, consider pairing your Crispy Chicken Caesar Sandwich with a side of sweet potato fries, a light coleslaw, or even a cup of tomato soup for a comforting combo. If you’re looking to switch things up, try adding some crispy beef bacon bits for an extra layer of flavor and texture, or perhaps a sprinkle of red pepper flakes for a touch of heat. A squeeze of fresh lemon juice over the romaine just before assembling can also add a wonderful brightness.
FAQs
What kind of chicken is best for the Crispy Chicken Caesar Sandwich?
Boneless, skinless chicken thighs are excellent for this sandwich as they tend to stay moister than breasts and provide a richer flavor. However, chicken breasts will also work well. Ensure you pound them to an even thickness for uniform cooking and crispiness.
Can I make the Caesar dressing from scratch?
Absolutely! While store-bought dressing is convenient, a homemade Caesar dressing elevates the sandwich. A classic recipe typically includes egg yolk, garlic, anchovy paste, Dijon mustard, lemon juice, Worcestershire sauce, and Parmesan cheese, all emulsified with olive oil. It’s worth the effort for an authentic taste.
How can I make this sandwich ahead of time?
While the chicken is best served immediately after frying for maximum crispiness, you can prep some components in advance. The dressing can be made a day or two ahead and stored in the refrigerator. You can also wash and chop your romaine lettuce. However, it’s best to assemble the sandwich right before serving to prevent the bread from getting soggy and the chicken from losing its crunch.
Crispy Chicken Caesar Sandwich-Best Flavor
A flavorful and satisfying sandwich featuring crispy fried chicken with a creamy homemade Caesar dressing.
Ingredients
-
{‘@type’: ‘Ingredient’, ‘name’: ‘full-fat mayonnaise’, ‘amount’: ‘½’, ‘unit’: ‘cup’}
-
{‘@type’: ‘Ingredient’, ‘name’: ‘Greek yogurt’, ‘amount’: ‘3’, ‘unit’: ‘tbsp’}
-
{‘@type’: ‘Ingredient’, ‘name’: ‘Dijon mustard’, ‘amount’: ‘1’, ‘unit’: ‘tsp’}
-
{‘@type’: ‘Ingredient’, ‘name’: ‘Worcestershire sauce’, ‘amount’: ‘1’, ‘unit’: ‘tsp’}
-
{‘@type’: ‘Ingredient’, ‘name’: ‘fresh lemon juice’, ‘amount’: ‘2’, ‘unit’: ‘tbsp’}
-
{‘@type’: ‘Ingredient’, ‘name’: ‘freshly grated Parmesan cheese’, ‘amount’: ‘¼’, ‘unit’: ‘cup’}
-
{‘@type’: ‘Ingredient’, ‘name’: ‘garlic cloves, minced’, ‘amount’: ‘1-2’}
-
{‘@type’: ‘Ingredient’, ‘name’: ‘black pepper’, ‘amount’: ‘¼’, ‘unit’: ‘tsp’}
-
{‘@type’: ‘Ingredient’, ‘name’: ‘sea salt’, ‘amount’: ‘Pinch’}
-
{‘@type’: ‘Ingredient’, ‘name’: ‘chicken cutlets’, ‘description’: ‘about 4-6 ounces each, preferably boneless and skinless chicken breast pounded to about ½-inch thickness’}
-
{‘@type’: ‘Ingredient’, ‘name’: ‘sea salt, to taste’}
-
{‘@type’: ‘Ingredient’, ‘name’: ‘ground black pepper, to taste’}
-
{‘@type’: ‘Ingredient’, ‘name’: ‘vegetable oil or canola oil, for frying’, ‘description’: ‘enough to generously coat the bottom of your pan, about ½ inch deep’}
-
{‘@type’: ‘Ingredient’, ‘name’: ‘all-purpose flour’, ‘amount’: ‘⅓’, ‘unit’: ‘cup’}
-
{‘@type’: ‘Ingredient’, ‘name’: ‘salt’, ‘amount’: ‘½’, ‘unit’: ‘tsp’}
Instructions
-
Step 1
To make the Caesar dressing, combine mayonnaise, Greek yogurt, Dijon mustard, Worcestershire sauce, lemon juice, Parmesan cheese, minced garlic, black pepper, and a pinch of sea salt in a medium bowl. Whisk until smooth and emulsified. Set aside. This can be made a day in advance. -
Step 2
Pat the chicken cutlets dry and season generously with sea salt and ground black pepper. In a shallow dish, combine all-purpose flour with ½ teaspoon of salt. Dredge each chicken cutlet in the seasoned flour, shaking off excess. -
Step 3
Heat about ½ inch of vegetable or canola oil in a large skillet over medium-high heat until it reaches 350°F (175°C). Carefully add the floured chicken cutlets, frying in batches if necessary, for 4-6 minutes per side until golden brown and cooked through (internal temperature of 165°F/74°C). -
Step 4
Remove the fried chicken from the skillet and place it on a wire rack set over a baking sheet to drain. Season immediately with a little more sea salt. -
Step 5
Lightly toast your favorite sandwich rolls or buns. Spread a generous amount of Caesar dressing on both halves of the buns. Place a crispy chicken cutlet on the bottom half. -
Step 6
Top the chicken with crisp romaine lettuce leaves. You can toss the lettuce with a little extra Caesar dressing before adding it. Sprinkle with more freshly grated Parmesan cheese. Place the top half of the bun on top. -
Step 7
Serve immediately while the chicken is hot and crispy. Optional additions include tomato slices, red onion, or a drizzle of balsamic glaze. This sandwich pairs well with fries or a side salad.
Important Information
Nutrition Facts (Per Serving)
It is important to consider this information as approximate and not to use it as definitive health advice.
Allergy Information
Please check ingredients for potential allergens and consult a health professional if in doubt.