Biscoff Cookie Butter Cheesecake Pops Recipe
Biscoff Cookie Butter Cheesecake Pops are about to become your new obsession. If you’ve ever found yourself lost in the creamy, dreamy allure of cheesecake, or utterly captivated by the spiced perfection of Biscoff cookies, then prepare yourself. We’re taking those two beloved flavors and transforming them into something truly magical. Imagin extracte biting into a rich, decadent cheesecake, infused with the irresistible essence of Biscoff cookie butter, all nestled within a sweet, crum extractbly cookie crust. That’s the promise of these delightful pops. They’re not just a dessert; they’re an experience, a perfectly portioned bite of pure bliss that combines the comforting familiarity of cheesecake with the unique, addictive charm of Biscoff cookie butter. Get ready for a flavor explosion that will have you reaching for more!
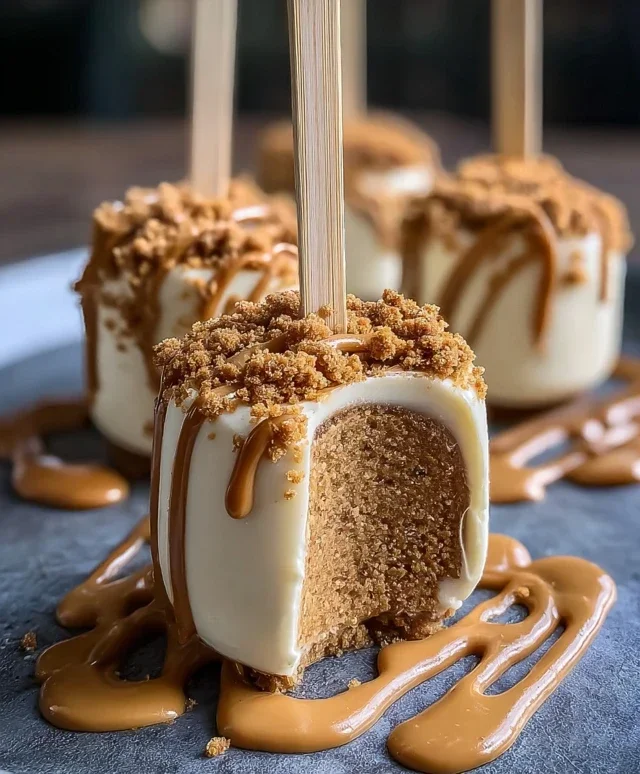
Biscoff Cookie Butter Cheesecake Pops
Get ready to elevate your dessert game with these utterly delightful Biscoff Cookie Butter Cheesecake Pops! If you’re a fan of creamy cheesecake and the irresistible spiced caramel flavor of Biscoff cookies, then this recipe is your new best friend. These pops are perfect for parties, a fun treat for the kids, or honestly, just because you deserve something wonderfully sweet and easy to enjoy. The combination of smooth, tangy cheesecake filling swirled with rich Biscoff cookie butter, all encased in a delightful cookie coating, is pure magic. They’re surprisingly simple to make and incredibly rewarding. Let’s dive in and create some edible happiness!
Ingredients:
Crafting the Creamy Cheesecake Base
The first step to these amazing pops is creating the luscious cheesecake filling. It’s important that your cream cheese is truly softened. This means taking it out of the refrigerator about an hour before you plan to start mixing. Cold cream cheese will lead to lumps, and nobody wants lumpy cheesecake, right? In a medium bowl, beat the softened cream cheese until it’s completely smooth and creamy. You can use an electric mixer for this, which makes it super easy, or a sturdy whisk and some elbow grease. Once the cream cheese is smooth, gradually add the powdered sugar. Mix on low speed at first to prevent a cloud of sugar from erupting, then increase the speed to combine it thoroughly. You’re aiming for a silky-smooth mixture with no grainy texture. Next, stir in the vanilla extract. Vanilla is key for that classic cheesecake flavor, so don’t skip it!
Incorporating the Whipped Cream and Cookie Crum extractbles
Now it’s time to lighten up our cheesecake base. Gently fold in the ½ cup of whipped cream or thawed Cool Whip. Folding is a gentle mixing technique where you cut down through the center of the mixture with a spatula, sweep across the bottom, and bring the batter up and over. This process preserves the airiness of the whipped cream, ensuring your cheesecake filling is light and fluffy, not dense. After the whipped cream is incorporated, it’s time for the star of the show – the crushed Biscoff cookies! Add the ½ cup of finely crushed Biscoff cookies to the mixture. These little cookie bits add a delightful texture and an extra punch of that signature Biscoff flavor. Gently fold them in until they are evenly distributed throughout the cheesecake base. You should have a wonderfully creamy, slightly textured batter at this point.
Swirling in the Biscoff Cookie Butter Bliss
This is where the magic really happens! Take your ½ cup of Biscoff cookie butter. If your cookie butter is very thick, you might want to warm it slightly. You can do this by placing the jar in a bowl of warm water for a few minutes, or by gently heating 2 tablespoons of heavy cream in a small saucepan or microwave and then whisking it into the cookie butter. This optional step will make it easier to swirl. Now, dollop spoonfuls of the Biscoff cookie butter over the cheesecake mixture. Don’t aim for perfection here; uneven dollops are what create those beautiful swirls. Take a skewer or a knife and gently swirl the cookie butter into the cheesecake batter. You want to create ribbons and pockets of cookie butter, not completely mix it in. Think marbled artistry! This step is crucial for getting that distinct Biscoff cookie butter flavor in every bite.
Forming and Freezing the Cheesecake Pops
Now for the fun part of turning our delicious mixture into pops! Line a baking sheet or a large plate with parchment paper. This prevents sticking and makes it easier to remove the pops once they are frozen. Using a cookie scoop or two spoons, portion out the cheesecake mixture onto the parchment paper. You can make them as large or as small as you like, but aim for a uniform size so they freeze evenly. Once you have your dollops, it’s time to insert the popsicle sticks. Gently push a popsicle stick into the side of each cheesecake mound, ensuring it goes about halfway in to provide a good grip. Carefully place the baking sheet or plate into the freezer. You’ll need to freeze these for at least 2-3 hours, or until they are completely firm. This is essential for them to hold their shape when you take them out for dipping or serving. The longer they freeze, the firmer they will become, making them easier to handle.
Decorating Your Biscoff Masterpieces
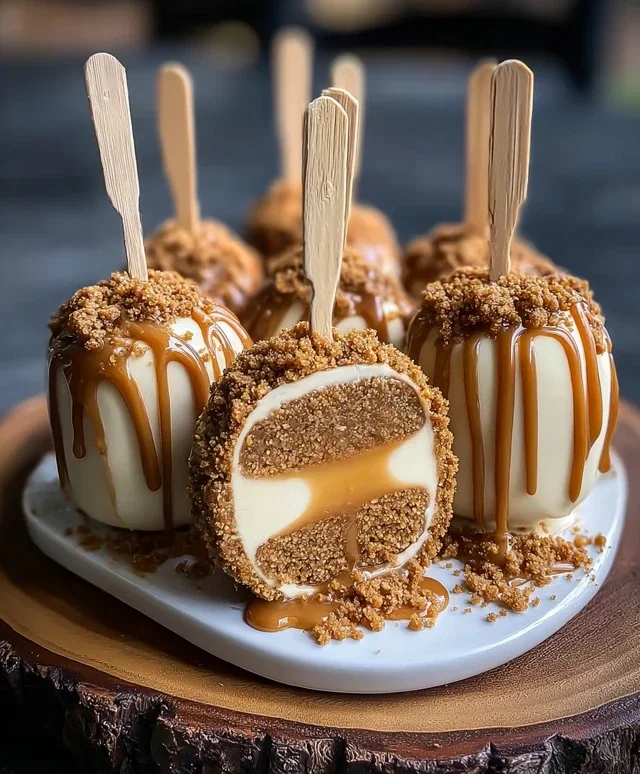
Once your cheesecake pops are thoroughly frozen and firm, it’s time for the grand finnon-alcoholic ale: decoration! You can serve them just as they are, with their beautiful swirls and cookie crum extractbles, or take them up a notch. For an extra layer of indulgence, you can melt some additional Biscoff cookie butter or even a bit of chocolate and dip the frozen pops into it. Before the melted coating sets, sprinkle them generously with the extra crushed Biscoff cookies. You can also press a whole Biscoff cookie onto the side of each pop for an extra decorative touch. Get creative with your decorating! You can also drizzle them with melted chocolate or even add a sprinkle of edible glitter. These pops are best enjoyed straight from the freezer, so have them ready to go when your guests arrive or when the sweet craving strikes. Enjoy every delightful, creamy, cookie-buttery bite!
Conclusion:
There you have it – the ultimate guide to crafting these absolutely delightful Biscoff Cookie Butter Cheesecake Pops! These little bites of heaven are a fantastic way to elevate any gathering or simply treat yourself to something truly special. The irresistible combination of creamy cheesecake, the warm, spiced notes of Biscoff cookie butter, and the satisfying crunch of a cookie crust is simply unparalleled. They’re incredibly fun to make and even more enjoyable to eat, offering a perfect portion-controlled indulgence. I can’t wait for you to try them!
These pops are wonderfully versatile. Serve them chilled as a sophisticated dessert at parties, alongside coffee for a delightful afternoon treat, or even as a unique addition to a dessert bar. For variations, consider adding a swirl of extra cookie butter into the cheesecake filling before freezing, or even incorporating finely chopped Biscoff cookies into the batter for an extra layer of texture. Don’t be afraid to experiment with different toppings like a drizzle of melted chocolate or a sprinkle of crushed nuts. I truly encourage you to give this Biscoff Cookie Butter Cheesecake Pops recipe a go – you won’t regret it!
Frequently Asked Questions:
Can I make these ahead of time?
Absolutely! These Biscoff Cookie Butter Cheesecake Pops are perfect for making ahead. Once they are fully frozen, you can store them in an airtight container in the freezer for up to 2 weeks. This makes them an ideal make-ahead dessert for parties or when you’re craving a sweet treat.
What’s the best way to store leftover pops?
For the best results, store any leftover cheesecake pops in an airtight container in the freezer. Ensure they are well-wrapped to prevent freezer burn. They should maintain their delicious texture for several weeks.
Can I use a different type of cookie butter?
While Biscoff is the star here, you could certainly experiment with other speculoos or spiced cookie butters if you have them on hand. The flavor profile might change slightly, but it would likely still be delicious!
Biscoff Cookie Butter Cheesecake Pops
Delicious no-bake cheesecake pops infused with the unique flavor of Biscoff cookies and cookie butter, perfect for a sweet treat.
Ingredients
-
8 oz cream cheese, softened
-
½ cup powdered sugar
-
1 teaspoon vanilla extract
-
½ cup whipped cream (or Cool Whip)
-
½ cup crushed Biscoff cookies
-
½ cup Biscoff cookie butter
-
2 tablespoons heavy cream (optional, for thinning)
-
Whole Biscoff cookies
-
Extra crushed Biscoff cookies for garnish
-
Popsicle sticks
Instructions
-
Step 1
In a large bowl, beat the softened cream cheese and powdered sugar until smooth and creamy. -
Step 2
Stir in the vanilla extract and Biscoff cookie butter until well combined. -
Step 3
Gently fold in the whipped cream (or Cool Whip) and ½ cup crushed Biscoff cookies until just incorporated. If the mixture is too thick, stir in the heavy cream, 1 tablespoon at a time. -
Step 4
Line a baking sheet with parchment paper. Scoop rounded tablespoons of the cheesecake mixture and place them onto the prepared baking sheet. Insert a popsicle stick into each scoop. -
Step 5
Freeze for at least 2-3 hours, or until firm. Once firm, you can optionally dip them in melted Biscoff cookie butter or drizzle with it. -
Step 6
Garnish with extra crushed Biscoff cookies before serving. Store any leftover pops in the freezer.
Important Information
Nutrition Facts (Per Serving)
It is important to consider this information as approximate and not to use it as definitive health advice.
Allergy Information
Please check ingredients for potential allergens and consult a health professional if in doubt.